Archival Ink Swap for the Pilot v5 or v7 Pen

A DIY tutorial: how to do a simple ink-swap for one of the world's most fabulous drawing pens.
Why You'd Want to Do an Ink Swap
My last post, detailing my journey to finding a great archival drawing pen, described the merits of the pilot V5 / pilot V7 and why I would take the trouble to retrofit one at all. So, assuming you love the V5/V7, here is why you might want to do an ink swap:
1. Refills. To answer the question simply, Pilot V5s/V7s are incredible pens, but the classic ones run out of ink and you have to throw the whole pen away (!) --an unnecessary waste. With DIY refills you can get a lot more mileage out of that beautiful piece of plastic.
Pilot recently created a cartridge system for the Pilot V5/V7 (insert here raucous cheers and shouts of joy). One major plus to the Pilot cartridge pen is that the refillable pens are supposed to be able to handle airplane trips (hurrah! hurrah! And an end to ruined carryon bags)... but, refillable Pilots are not widely available in the USA, and it still doesn't solve the problem of needing artist-grade inks.
2. Fun or Functionality. The ink that comes with the classic Pilot V5/V7 is pleasant to use, but an erring drop of water may cause you real heartache. For fine artists selling original drawings and also for writers, or really for anyone who is thoughtful about the longevity (or integrity) of their work, they may opt for the ease and assurance that comes from hand-picking a drawing ink. By the by, I'll toss out there that doing an ink swap with your pilot pen also tends to be cheaper than other options.
So, here are a few pics of how I do a DIY Pilot Pen ink swap!
I hope that these tips are helpful!


Here are a few tips and tricks that explain the process:
Step 1: Your Supplies
High-quality archival fountain pen ink
Pliars
A near-empty Pilot V5 or Pilot V7 Pen
An eye dropper to get the ink from the bottle to the pen's interior
An old t-shirt or paper towels
Pro tip: It's important to perform the ink swap before the original pen's ink dries out completely, since dried ink can clog and ruin the pen tip. (This means there will also be a small mixture of the original Pilot ink along with the new archival ink unless you clean out the interior after pulling the pen apart in step 3).
A Word About Inks:
The most critical part of this process is to find the inks that suit your purposes (this may take some experimentation). Each ink behaves differently, and will handle differently on different kinds of papers.
It's also important to remember that Pilot V5s / Pilot V7s take fountain pen ink, not dipping ink. If you are lucky enough to have a fine pen store in your city (or a killer art store), that is a great place to start since their staff can answer questions that are specific to your goals and projects.
Side note: Sign with Prestige is a Fort Collins based store (with an online store, too) that has really friendly staff. They've helped me tremendously in my ongoing exploration of materials. I'd also recommend checking out Noodler's Ink, a company that is passionately dedicated to developing and manufacturing some of the most unique and interesting fountain ink formulations.
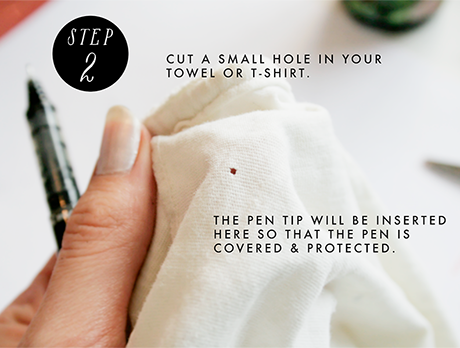
Step 2: Mitigate the Mess
Fashioning a pen-tip protector (shown above), is totally optional. You can use paper towels or whatever is handy, but a old t-shirt works best to protect the pen tip and to catch any spills.
Steps 3 & 4: The tricky part
When grasping the pen tip with pliers, aim a little below the true tip-- on the cone-shaped plastic piece. If you're not quite sure where to grip it, there is a picture of the pen tip shown in step one with an arrow pointing to the area where it's best to grip the pen top with pliers.
Step four is the hardest part. You'll basically pull the top of the pen out from the body of the pen. Once, I grasped the pen tip too high and pulled out the tip of the pen instead of the whole interior, but luckily I was able to replace the tip and try again. However, even when grasping the right area it can be a bit tricky to pull the pen out. Just be gentle and persistent!
After the interior is removed, fill the insides about 3/4 full of ink (you can gauge this by looking through the "window" on the side of the pen). When you've re-filled the barrel with ink, replace the pen's insides the same way you took them out. Using the pliers, push the pen's interior back into place.
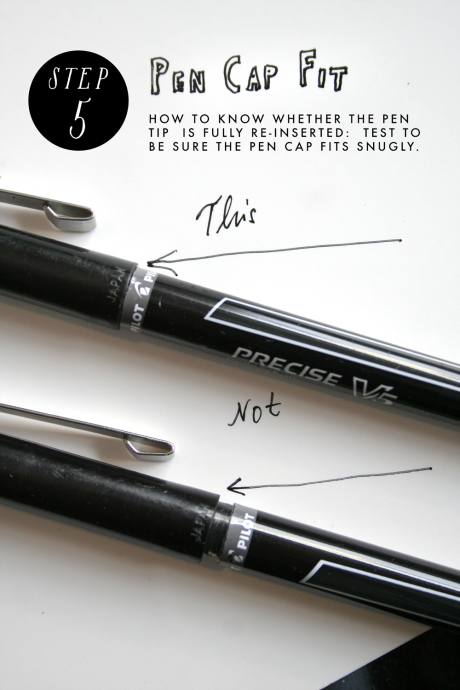
Step 5: Test for Fit
Finally, after refilling the body and replacing the interior, test the fit of the pen cap to be sure that it fits snugly. When you replace the interior, it may look like it's been re-inserted all the way back into the pen body, but it often needs a little extra shove.
If the pen cap does not fully snap into its proper place, take the pliers and grasp the pen top in the same place you held it to pull out the interior, and push the insert toward the back of the pen until it clicks fully into place. You'll know it's snugly re-inserted when the pen cap fits naturally.
Finishing touches:
When I'm finished retrofitting a new pen, I mark it with a piece of washi tape, so I can keep it separate from pens that still contain the original ink.
A Word to the Wise: though I've mentioned it in other posts, it probably bears repeating: it's good to be cautious when retrofitting pens. Even the unmodified V5 / V7 is known to have a few upsets (especially, but not limited to airplane trips), and a modified V5 / V7 will have less internal integrity than a new one. I keep an eye on V5s /V7s in general--but especially modified ones-- and keep them away from things that can stain (for example a lovely vintage couch or anything else that would be endangered by errant ink)!
Despite the risk of a modified pen, this pen's amazing ability to handle both the speed of gesture drawings and the slow work of detail makes it well worth the effort.
Enjoy, get out there, and make some awesome drawings!!